This short guide explains clearly where to connect a printer and how to finish setup without guesswork. It helps a beginner act with confidence at their computer.
We cover common ports such as front and rear USB, plus Ethernet and Wi‑Fi network options. You will get practical notes that compare each choice for everyday stability and speed.
The structure is simple: identify the right port, pick the correct cable, use Windows settings for setup, and run quick tests. We will also explain driver installation and basic troubleshooting steps.
Make sure you have the power lead, the right USB cable if needed, and your Wi‑Fi password at hand. Where useful, we point to official support categories like Software & Drivers, Manuals, Help Library and 24/7 chat for extra help.
Result: by the end you will know which connection suits your space and how to confirm the device works.
Quick answer: the right port to use on your gaming PC
If you need a single clear step: plug the USB‑B end into the printer and the USB‑A end into a rear USB port on your computer for the most stable connection. This is the simplest way to connect printer hardware for everyday use.
Rear I/O ports are wired directly to the motherboard, which cuts intermittent faults during long print runs. Front-panel sockets are handy for quick access, but they risk accidental disconnects and cable strain if left plugged in permanently.
“A rear USB link reduces dropouts and gives a rock‑solid link for long jobs.”
If the device supports Ethernet or Wi‑Fi, you can add it via your home network and then add the unit in Windows Settings. This is ideal when the computer is tucked under a desk or the printer sits elsewhere in the room.
- Tip: make sure the printer is powered on before connecting; powered devices register more reliably.
- Note: modern notebooks and some newer machines use USB‑C, but most desktops still expect USB‑B to USB‑A cables—use an adaptor if needed.
| Port type | Best use | Notes |
|---|---|---|
| Rear USB | Permanent local connection | Most reliable; motherboard‑wired |
| Front USB | Temporary or quick plug‑in | Convenient but prone to strain |
| Ethernet/Wi‑Fi | Shared network access | Flexible for multiple machines; needs SSID/password |
Understanding printer connection types: USB, network, and wireless
Different link methods—USB, Ethernet and Wi‑Fi—each offer clear trade-offs for speed, simplicity and sharing.
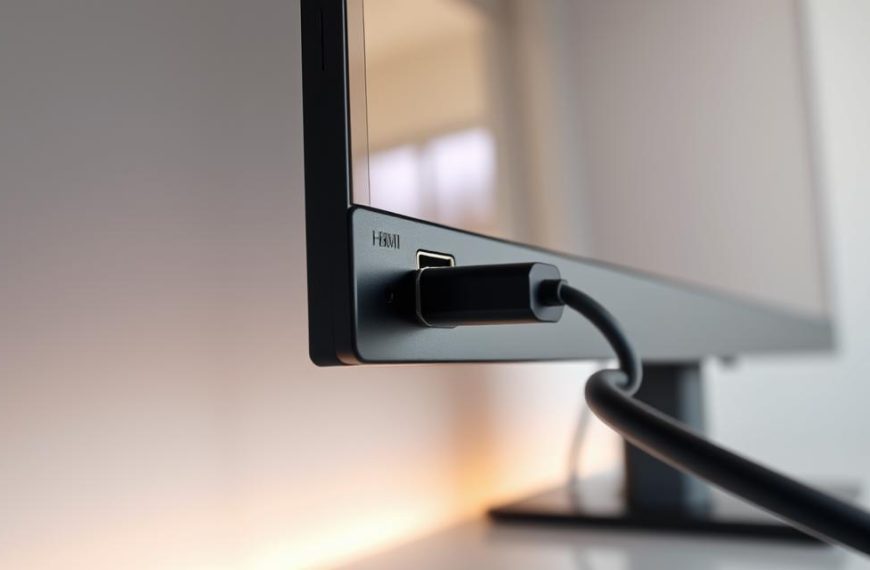
USB‑A to USB‑B: the classic “square” plug remains the most common for desktop setups. A simple usb cable gives a low‑latency, stable link that works well for single‑computer use and long print jobs.
USB‑C and modern devices: many new machines and some printers use USB‑C. If both devices support it, use a direct USB‑C to USB‑C lead. Otherwise, a USB‑C to USB‑B cable or an adaptor will let you keep using existing hardware.
Ethernet vs Wi‑Fi: Ethernet is best when you need steady throughput and easy discovery for shared use. Wi‑Fi gives flexible placement and fewer cables, but signal strength and interference can affect reliability.

Selection advice: pick USB for simple direct setup, Ethernet for maximum reliability in shared homes, and Wi‑Fi for rooms where running cable is impractical. Secure wireless networks with WPA2/WPA3 and change default admin passwords on the device web interface.
| Method | Best for | Pros | Cons |
|---|---|---|---|
| USB‑A to USB‑B | Single computer | Stable, plug‑and‑play | Limited sharing |
| USB‑C | Modern devices | Fast, reversible plug | May need adaptors |
| Ethernet | Shared locations | Consistent throughput, easy discovery | Requires cable |
| Wi‑Fi | Flexible placement | No cables, multi‑device access | Signal may vary |
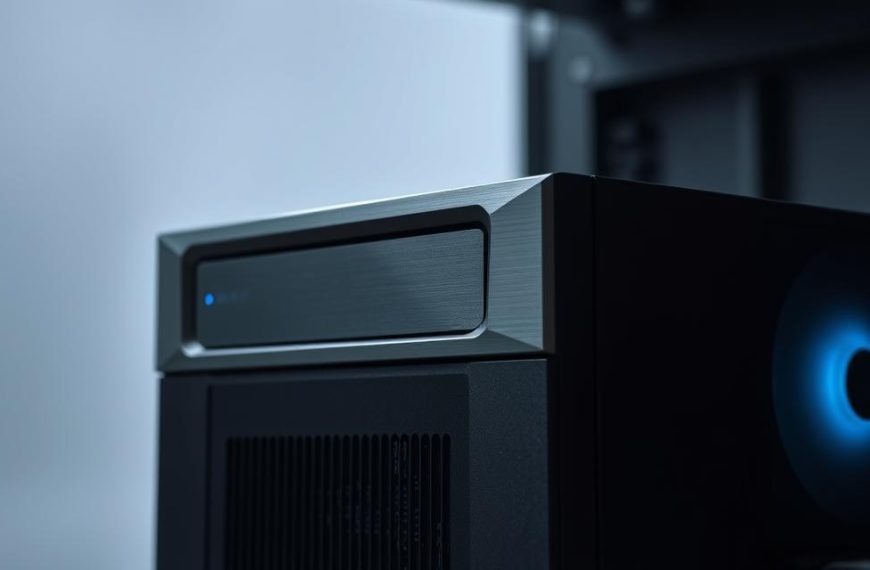
Identifying the correct computer USB port on a gaming desktop
Pick the socket that gives the steadiest electrical and data link. For most users, that means using a rear I/O connection. Rear sockets are mounted directly on the motherboard and cut down on dropouts during long jobs.
Front-panel vs rear I/O USB ports for stable printing
Front-panel ports are convenient for quick plugs and temporary use. They route through internal cables and can suffer intermittent contact if cables are strained or bumped.
By contrast, rear I/O ports sit on the case back and offer a firmer electrical path. For a permanent setup, choose a rear port and give the cable slack so movement won’t stress the connector.
USB 2.0 vs USB 3.x for printers: does speed matter?
Most modern printers never saturate USB bandwidth. USB 2.0 will usually handle print jobs perfectly. Compatibility and a solid link matter more than raw throughput.
- Identification tip: blue or teal inserts often mark USB 3.x; black or white usually mean USB 2.0.
- High-power ports: some motherboard ports offer extra current. If you see dropouts, try a standard rear port to isolate the issue.
- Troubleshooting: if Windows does not detect the device, try a different rear port, check the cable and confirm the unit is powered on before opening Settings again.
| Option | Best for | Note |
|---|---|---|
| Rear I/O | Permanent link | Most stable, motherboard wired |
| Front-panel | Temporary use | Convenient but prone to knocks |
| Network | Shared access | USB choice is irrelevant if using Wi‑Fi or Ethernet |
Safety tip: make sure cables are not under tension and unplug gently if you must re-seat a tight connection.
Choosing and preparing the right cable for your printer
Pick a cable that matches both device ports and the distance you need; the right lead removes most setup headaches.

USB cable types explained
Most desktop units still use a USB‑B socket — the square plug with chamfered corners — and pair with a USB‑A plug at the computer. Some modern devices use USB‑C; that will need a matching lead or an adaptor.
Length, quality and interference
Choose the shortest cable that reaches without strain. Long runs can degrade signal, especially near power supplies and fans.
Use certified, shielded leads where possible. Shielding cuts electrical noise and improves reliability when several devices share the same desk area.
- Check the port visually so you buy the correct ends first; this saves time and extra purchases.
- Swap a suspect lead if the device drops out — worn or thin wiring is a common fault.
- For long distances, consider a network alternative such as Ethernet or Wi‑Fi rather than an excessive USB run.
Make sure the connector is fully seated at both ends. Keep a spare cable and label leads if you manage several devices; braided cords give added durability if gear moves often.
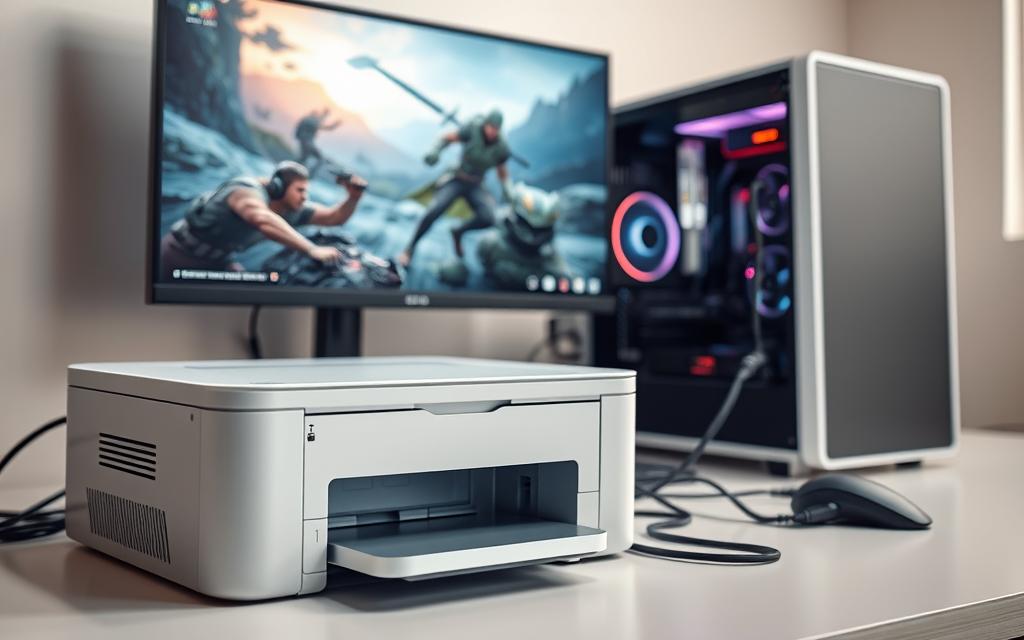
How to connect your printer with a USB cable
Use a direct USB lead for the most straightforward initial setup. This simple method gets most users printing fast and avoids network steps while you confirm basic function.
Power on, plug in, and wait: the simplest method
Step 1: power the device and allow it a few seconds to finish its startup cycle.
Step 2: attach the usb cable from the printer into a rear USB port at the back of your computer. Windows usually detects a new device within seconds.
Windows prompts and basic driver installation
If a notification appears saying Windows is setting up the device, let it finish. Class drivers often install automatically and permit basic printing without extra software.
If nothing appears, open Settings and check Printers & scanners. We cover manual add steps later if required.
- Try a different rear port or reseat the cable if Windows reports an error.
- Make sure any USB hubs are powered; unpowered hubs can fail with multiple devices.
- A short internet link helps Windows fetch an updated generic driver if needed.
- Print a test page once installed to confirm the pathway from application to device works.
| Action | Expected result | Troubleshoot |
|---|---|---|
| Power on then connect | Windows detects device | Wait 10–20s; reseat cable |
| Allow Windows setup | Basic drivers install | Open Settings > Printers & scanners if not listed |
| Print test page | Confirm output path | Try network method if repeated failures occur |
How to add a network printer on your gaming PC
A network installation removes cable swapping and lets households print from different systems easily. Follow the quick steps below for both wired and wireless links.
Connecting the unit via Ethernet or Wi‑Fi
Ethernet: plug the LAN socket at the rear of the device into an open router port. Wait for the link lights and confirm the unit has an IP address in the router admin page.
Wi‑Fi: use the device control panel to join your SSID with the password. Many models also offer WPS for a faster join process.
Using Windows Settings to add a network device
Open Settings, go to Bluetooth & devices, then Printers & scanners and select Add device. Windows will search the local network and list available models for you to choose and install.
Static IP vs automatic discovery
Automatic discovery suits most home setups and is the fastest option. The unit should appear by name or IP after joining the network.
Use a static IP when you print often, have multiple computers, or want to avoid re‑discovery after router restarts. Reserve or assign a fixed address in your router and note the choice for other devices.
- If the unit does not appear, use Add manually and enter its IP or hostname.
- Make sure both computer and device share the same network segment and check Wi‑Fi signal where the unit sits.
- Many models offer a built‑in web interface; open a browser at the unit’s IP to view status and tests.
| Method | Best for | Notes |
|---|---|---|
| Ethernet | Consistent, heavy jobs | Stable link; check router port lights |
| Wi‑Fi | Flexible placement | Easy setup; test signal strength |
| Static IP | Frequent multi‑user use | Reserve via router to avoid re‑discovery |
Using Windows Settings to add a printer step-by-step
Use the Settings app to locate and register your device, whether it is USB linked or visible on the local network.

Open the Settings menu from the Start menu or press Windows + I. Select Bluetooth & devices to view peripheral options.
Click Printers & scanners, then choose Add device. Windows will scan for nearby devices and list matches.
If the unit appears, select it and follow the on‑screen prompts. Wait while Windows may download a basic driver; allow the process to finish before printing.
If nothing shows, click Add manually. Enter the unit’s IP address for a network setup or choose Add a local printer for advanced USB installation.
Give the new entry a clear name such as Desk Inkjet (USB) or Office Laser (Ethernet). This makes selection easier later.
“Make sure both computer and device share the same network segment if discovery fails.”
If discovery still fails, temporarily disable VPN, reboot both machines and try again. Print a Windows test page to confirm communication before using applications.
Install necessary drivers and software for advanced features
Windows can often get you printing fast, but official packages unlock full device capability.

Visit the printer manufacturer Software & Drivers page and enter your exact model number. Download the recommended driver bundle first; this ensures the core services register correctly with the OS.
Next, install optional software such as scanning utilities, ink/toner dashboards and network discovery tools. These add-ons enable advanced features like scheduled maintenance, quick scan‑to‑PDF and firmware update utilities.
Manuals, Help Library and support channels
Check Manuals & Documents and the Help Library for step‑by‑step instructions and button sequences specific to your model. If you are unsure which file to pick, use online chat or email support offered on the vendor portal.
- Remove legacy packages from old installs before adding new drivers to avoid conflicts.
- After installation, run the manufacturer tool and check for firmware updates.
- Reboot the computer if the installer requests it to finalise services.
| Item | Why install | Notes |
|---|---|---|
| Driver bundle | Enables printing and device services | Install first; required for full functionality |
| Utilities & scans | Access scanning and maintenance tools | Optional but recommended for advanced features |
| Network discovery | Simplifies finding device on local network | Useful if initial Windows discovery failed |
“Always download drivers and software from the official vendor portal for the safest, most current packages.”
Troubleshooting connection issues on first setup
Start with simple checks that often fix detection problems quickly: power cycles, cable swaps and port tests.

Device not recognised via USB: ports, cables and power cycles
Try a different rear USB port and reseat both ends of the cable. This clears many transient enumeration faults.
If detection still fails, swap the lead for a known‑good cable. Cable faults cause many intermittent appearances in Windows Devices and Printers.
Power cycle both the computer and the printer. Rebooting can force the OS to re‑enumerate the device and load drivers cleanly.
Network unit not found: SSID, password and router checks
Confirm the unit joined the correct SSID and that the password was entered correctly. Many models can print a network status page with an IP address.
Make sure both computer and the printer sit on the same subnet; guest Wi‑Fi or band steering can isolate devices and block discovery.
If discovery fails, reboot the router. This often restores multicast and DHCP services that printers rely upon.
Driver conflicts: remove old entries in Printers & scanners
If installation hangs, open Settings and remove any partial entries under Printers & scanners, then retry the add process.
Uninstall legacy drivers that match different models. Leftover drivers can confuse Windows about which queue should be active.
Follow instructions came with the device and use any setup app included in the instructions came printer package; this often streamlines network setup.
| Issue | Quick action | When to escalate |
|---|---|---|
| USB not detected | Try rear port, swap cable, reboot both devices | Test on another computer or replace cable |
| Not found on network | Check SSID/password, print status page, reboot router | Assign static IP or check router isolation rules |
| Installation hangs | Remove partial entries in Settings, uninstall old drivers | Download fresh drivers from vendor site |
“Temporarily disable VPNs or strict firewalls during first discovery; restore rules once the unit is visible.”
Scanning and printing: testing your setup with a sample document
Start simple and confirm both print and scan functions work correctly. Print a Windows test page from Settings first. This checks driver installation and basic output without application variables.
Open a common document such as a PDF and print one page. Check layout, margins and colour or grayscale output. This confirms applications can reach the device and that the document prints as expected.
Enable scanning features and verify transfer
If the unit is multifunction, install the manufacturer’s suite and enable TWAIN or WIA components. Run a simple 150–200 dpi scan and confirm the file appears in your chosen folder.
“Make sure the queue shows Ready rather than Offline before sending jobs over the network.”
- Test duplex printing and alternate trays if supported; note behaviour for future jobs.
- If streaks appear, run cleaning cycles in the software before critical documents.
- For stalled jobs, restart the Print Spooler service or reboot both computer and device.
| Test | What to check | Action if fail |
|---|---|---|
| Windows test page | Driver install and basic output | Reseat cable or re‑run add process |
| Single-page PDF | Layout, margins, colour | Adjust page size in Settings and retry |
| Scan test | File saved, correct resolution | Select correct device in software, re‑scan at 150 dpi |
Best practices to keep your printer reliable over time
Simple routines save time and reduce downtime. Small habits protect hardware and help you get consistent results from every job.
Positioning, ventilation and dust management
Place the unit on a stable, ventilated surface away from GPU and case exhausts. High heat and dust shorten component life and can cause paper jams.
Make sure there is adequate clearance for rear and top vents. Store paper in a dry spot to avoid humidity-related feeding problems.
Firmware, software and scheduled maintenance
Check for firmware updates quarterly using the manufacturer’s software. Updates often fix bugs and improve security for networked units.
Run built-in maintenance tools such as nozzle cleaning and alignment when output fades. These restore quality without a service visit.
- Dust the unit and keep cable slack so vibrations do not tug at connectors.
- Replace consumables before they are fully depleted to avoid air ingress and clogs.
- Reserve a DHCP address or use a static IP on networked devices for stable queues after router restarts.
- Keep a spare, quality cable among your accessories to rule out intermittent faults quickly.
- Print a simple test page every few weeks; it prevents jets drying and reveals fading early.
“A short maintenance schedule—check drivers, run cleaning cycles, and update firmware—keeps the unit ready when you need it.”
Create a brief checklist and follow it at regular intervals. These steps will keep the device dependable and extend its service life.
Where to connect printer on a gaming pc
A steady data and power feed usually comes from the motherboard‑mounted USB sockets found at the case rear.
Use the rear computer usb port on the I/O panel for the most consistent results. These sockets sit directly on the motherboard and cut down on intermittent faults during long runs.
Front‑panel usb port sockets are fine for quick access or temporary tasks. For a permanent link, choose the rear ports to reduce accidental unplugging when the tower moves.
- Identify ports: look for rectangular USB‑A sockets grouped near audio and display connectors and often labelled with the USB symbol.
- Network option: place the unit away from the system or share with other devices by using Ethernet or Wi‑Fi instead of a direct cable.
- Cable care: route leads without tight bends and use clips behind the desk to cut strain on sockets.
For small form‑factor cases with limited rear sockets, a powered hub helps, but direct motherboard ports remain preferable. If the model supports only USB, a simple USB‑A to USB‑B lead will be what most setups require.
“Windows will usually detect the device automatically once it is powered and connected, making setup straightforward.”
Label the chosen socket or photograph the routing. This makes reconnection faster after cleaning or when you upgrade components.
When you may need accessories, hubs, or adaptors
Expanding USB capacity is about reliability, not just adding sockets. Choose gear that preserves power and signal for critical jobs.
Using a powered USB hub versus motherboard ports
Powered hubs have their own supply and suit several peripherals. They keep voltage steady and cut enumeration faults.
Bus-powered hubs draw from the host and may falter with many devices. For stability, plug the printer directly into a rear usb port where possible.
USB‑C to USB‑B adaptors and compatibility tips
If the computer offers mainly USB‑C and the device uses USB‑B, use a single USB‑C to USB‑B cable or a short adaptor plus a good cable.
Avoid chaining adaptors; each junction can cause dropouts. For long runs, prefer network options rather than an extended usb cable.
“A powered hub is a practical fallback when ports run out, but a direct motherboard link should be the first choice for reliability.”
- Pick certified, shielded cables and keep them clear of PSU and GPU power leads.
- Keep a small kit: spare cable, USB‑C to USB‑A adaptor, and cable ties for quick fixes.
- Check hub firmware updates on higher‑end models for improved compatibility.
| Solution | Best use | Note |
|---|---|---|
| Rear motherboard port | Primary, stable link | Always preferred for main device |
| Powered USB hub | Multiple peripherals | Good if ports exhausted; needs PSU |
| USB‑C to USB‑B cable | Mixed‑port setups | Single purpose cable beats adaptor stacks |
Alternative ways and methods: print over the network without USB
Networked printing offers several practical methods for sharing a single device across multiple systems.
Router USB print servers and built-in print services
Some routers include a USB port and lightweight print services. Plug a device into the router and the unit can appear on the LAN for all authorised users.
Feature support is often limited, and model-specific drivers may be required on each computer. For reliability, prefer a unit with native Ethernet or Wi‑Fi where possible.
Cloud and mobile printing on Windows
Most manufacturers offer cloud or mobile options that let phones and remote laptops send jobs via vendor services or Windows utilities.
These options suit multi‑device households and reduce cable clutter. Install recommended software and add the device in Settings using its IP or discovery name.
“Centralising the unit on the network removes cable swapping and simplifies access for several devices.”
- Test printing from each device after setup; different operating systems may need specific drivers or queue names.
- Remember scanning and advanced colour controls often require the full vendor software on the computer.
- If your router is old, use a modern router or switch for better throughput and stability.
| Method | Best for | Notes |
|---|---|---|
| Router USB server | Simple sharing | Easy setup but limited features; driver quirks possible |
| Native Ethernet/Wi‑Fi | Multi‑device homes | Most reliable for discovery and full feature set |
| Cloud / mobile services | Remote or mobile printing | Good for phones; may need account setup and vendor software |
Finding support and assistance from trusted sources
When issues arise, the fastest route is often the manufacturer’s online help hub rather than general forums.
Start with the Help Library on the official site for step‑by‑step how‑tos and model‑specific troubleshooting articles. These guides often include video tutorials and download links for the correct software and drivers.
Check Manuals & Documents for exact button sequences and menu paths. A short read can save time and avoid unnecessary service requests.
Contact channels and practical tips
Use 24/7 chat for immediate assistance with common faults. For detailed cases, online chat or email allows you to share screenshots and logs.
- Bookmark the printer manufacturer’s Software & Drivers page and download packages only from that portal.
- Keep a document with model number, current driver version, connection method and any error text before you contact support.
- Social support channels can flag known issues quickly; avoid posting serials or personal details publicly.
- If hardware fault is suspected, request a repair but check warranty status first.
“Gathering model and network details speeds resolution and helps agents diagnose issues accurately.”
Conclusion
Use the guidance here to move from cabling to consistent printing with minimal fuss.
Recap: plug a usb cable into a rear computer usb port, power the unit and allow Windows to detect it. Follow the prompts in Settings and print a test document to confirm basic output.
If sharing is needed, choose network options: Ethernet for steady throughput or Wi‑Fi for flexible placement, then add the queue via the settings menu. If discovery fails, use Add manually and enter the device IP.
Install the manufacturer software and drivers after initial success. This unlocks scanning, maintenance routines and status dashboards tailored for your model. Follow the instructions came with the device and check official Manuals for model‑specific notes.
Quick checklist: confirm power and cabling, verify method (USB, Ethernet, Wi‑Fi), ensure the device appears in Settings, and run a document test. Keep a spare cable, check firmware periodically, and use vendor portals when you install necessary drivers.
Result: whether you prefer direct USB or a network printer, these steps give reliable ways from setup through everyday maintenance. Seek support or shop for quality cables and adaptors if you need extras.

 By
By